Set up your BigCommerce integration
We haven't seen any edits for a while. Still working?
After you've set up your TaxJar account, follow these steps to set up your BigCommerce integration.
In this article:
Connect BigCommerce to your TaxJar account
TaxJar supports connecting one BigCommerce store to your TaxJar account. To connect, follow these steps:
- Log into your BigCommerce account.
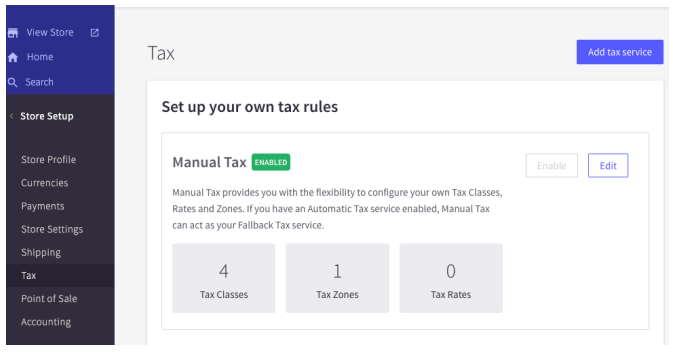
- Select Store Setup > Tax and then click Add tax service.
- Click Install next to TaxJar.
- To authorize connecting TaxJar to your BigCommerce store, click Confirm. You may need to log into your TaxJar account.
- After confirming and logging into TaxJar, you've successfully set up your BigCommerce store integration with TaxJar.

Enable TaxJar tax calculations for your BigCommerce store
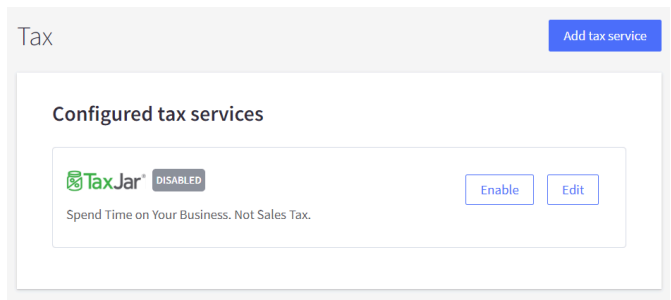
- Log into your BigCommerce account, then go to Store Setup > Tax, then select Enable next to TaxJar:
- In your TaxJar account, review your state nexus settings to confirm the list of states where you need TaxJar to calculate sales tax. Add or delete states, if needed.
- Also in your TaxJar state nexus settings, ensure that you have enabled the TaxJar API for each state. If the API is currently disabled, click on the state name, scroll down to the Advanced calculation settings box, and click Edit. Then select Enabled under the New API calculations dropdown box and click on Save Changes.

Set up fallback rates in BigCommerce
TaxJar's API has a 99.99% uptime. However, in the rare event of an API service interruption or a connection error between TaxJar and BigCommerce, BigCommerce will automatically default to a fallback sales tax rate of 10%. We strongly recommend that you take the time 2 to manually set up custom fallback rates, to ensure that your orders calculate more accurate tax calculations than the default 10%. Follow these steps:
- Go to Store Setup > Tax, and ensure that Manual tax is enabled.
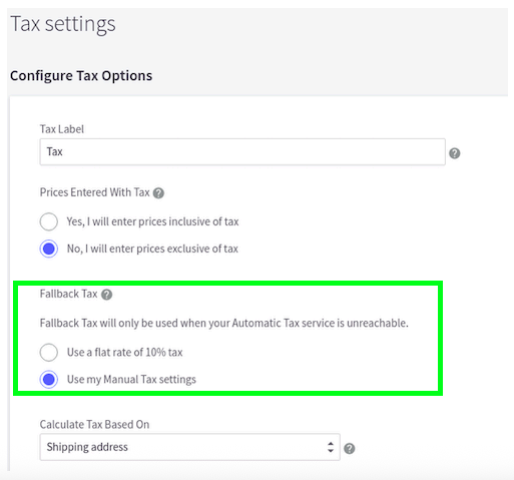
- In your tax settings under Configure Tax Options, select Use my Manual Tax settings instead of the flat rate of 10%:
- To set up the flat state sales tax rate for your nexus states, follow the BigCommerce instructions to set these up manually.
- For your non-nexus states, you can set up a rate of zero (0) to ensure that BigCommerce doesn't default to a 10% rate in the event of an API system error.

Categorize your products in BigCommerce
If you sell items that are fully or partially nontaxable, you can edit your products in BigCommerce to add a TaxJar product tax code. (You don’t need to categorize your products if everything you sell is always fully taxable.)
Set up customer exemption categories in BigCommerce
If you sell to a customer who is always exempt from paying sales tax, follow these steps:
- In your BigCommerce store, go to Customers > View and click the name of the customer you need to designate as exempt.
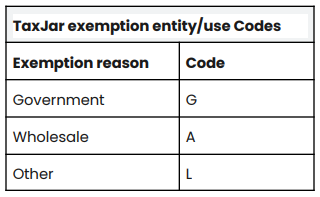
- In the Tax Exempt Code field, enter the appropriate entity/use letter code from the table below. (Important: If you enter any value in this field besides G, A, or L, TaxJar will automatically default to reason Other and assign code L):
- Click Save.

Whenever this customer orders from your BigCommerce store, they will not be charged sales tax. TaxJar will recognize these transactions as tax-exempt and categorize them accordingly in your TaxJar reports.
Categorize your exempt products in TaxJar
Once you’ve correctly set up your exempt and reduced-rate products in BigCommerce and linked BigCommerce to your TaxJar account, you need to categorize those products in the Product Exemptions tab of your TaxJar account. (If you do not sell exempt or reduced-rate items, you can skip this step.)
Categorizing your products will enable you to enroll in AutoFile and ensure that your exempt sales are excluded from the return. Your TaxJar Reports and Expected Sales Tax Due tab will also be more accurate, making it easier to troubleshoot any issues. If you do not take this step, your transactions that contain exempt or reduced-rate products will not reflect correctly in your TaxJar Reports.
- Click the Exemptions tab on your TaxJar dashboard and select Products. (Alternatively, you'll be guided to the Exemptions tab if you attempt to sign up for AutoFile and we see that you have untaxed transactions.) You'll then see a screen showing all your products.
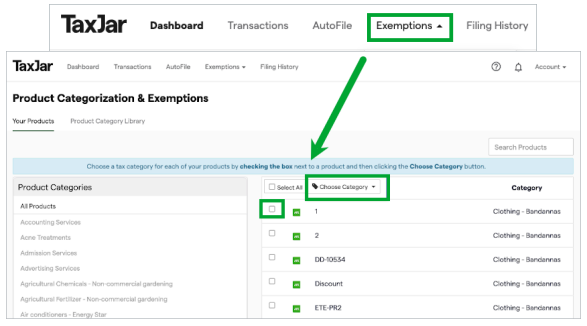
- Select one or more products and choose the appropriate category from the dropdown list. You can also use the search bar to locate specific products or product types. A list of all the categories that TaxJar supports is available on the TaxJar Developers Site. Your reports will now accurately reflect your fully and partially nontaxable products.


Test your integration
Although it’s not required, we recommend testing your integration before going live. Using a test account ensures that your test data remains separate from your production data. To create a test TaxJar account:
- Purchase a BigCommerce test environment.
- Create a free trial TaxJar account at https://www.taxjar.com and generate a live API token by selecting TaxJar API under the Account dropdown menu.
- Email your onboarding specialist or TaxJar support at support@taxjar.com and request that your trial account be converted to a test account.